Thursday, February 17, 2011

Is it harder to Unit Test in Grails than Java?. Or am i doing it wrong?


I want to develop a Service (A class method) that does the following. Receives some text, calls (POST to) some HTTP URL with that text as body, and retrieve the value of a cookie (SESSION_ID cookie) from the response.

If i were solving this in Java i would start with some test like this (This code doesn't compile I just wrote it in notepad):

  1. private CommunicationService testObj;
  2. private static String REQUEST=”ANY_REQUEST_WILL_DO”
  3. private static String URL_CONST=”http://www.google.com”
  4. private static String SESSION_ID=”aassdd”
  5. private Configuration conf;
  6. private CookieValueExtractor cookieValueExtractor;
  7. private HttpClient httpClient;
  8. private HttpResponse response;
  9.  
  10. @Before
  11. public void setup(){
  12.     conf=new MockConfiguration();
  13.     cookieValueExtractor=new MockCookieValueExtractor();
  14.     httpClient=new MockHttpClient();
  15.     response=new MockHttpResponse();
  16.     testObj.setConfiguration(conf);
  17.     testObj.setCookieValueExtractor(cookieValueExtractor);
  18.     testObj.setHttpClient(httpClient);
  19. }
  20.  
  21. @Test
  22. public void testSendRequestToHttpAndReturnSessionId(){
  23.     Capture<HttpPost> httpPost=new Capture<HttpPost>();
  24.     expect(conf.getServerUrl()).andReturn(URL_CONST);
  25.     expect(httpClient.execute(capture(httpPost))).andReturn(response);
  26.     expect(cookieValueExtractor.extractCookieByName(response,“SESSION_ID”)).andReturn(SESSION_ID)
  27.     String cookieValue = testObj.sendRequest(REQUEST);
  28.     assertEquals(URL_CONST,httpPost.getValue().getUri().toString());
  29.     assertEquals(SESSION_ID,cookieValue);
  30. }


Taking all setup code out, and focusing on the test method, we can see what we expect our method will do.

1. It will retrieve a URL for a Configuration facility
2. It will use HttpClient to send a Post to that URL
3. It will call a CookieExtractor facility to extract the cookie value we are interested in.
4 It will return that cookie value to the caller.


It is pretty easy to understand.

I now have the same requirement in a Grails project. Of course i want to use the power of Groovy and Grails, so i check the HttpBuilder library out, read a little bit about it and start to work.

The httpBuilder basically works by passing two parameters. A Map, with all the options (Including body, Path, etc) and a Closure that will get the response from the invocation.

Also i need to obtain some values like the URL from grails configuration files.

At the end, going to my implementation class and my test many times while developing(which i usually don’t need to in Java) i end with the following.


  1. void testMakeRequest() {
  2.        configureConfigurationHolder()
  3.        moneybookerService=new MoneybookerService()
  4.        def httpBuilderMock=new MockFor(HTTPBuilder.class)
  5.        httpBuilderMock.demand.post{
  6.            a,b ->
  7.            assertEquals("test_payment.pl",a["path"])
  8.            
  9.            def resp=new DummyResponseWithCookie()
  10.            resp.init()
  11.            def sessionId=b.call(resp)
  12.            
  13.            assertEquals("123123", sessionId)
  14.            
  15.        }
  16.        def mockService=httpBuilderMock.proxyInstance()
  17.        moneybookerService.httpBuilder=mockService
  18.        moneybookerService.makeRequest()    
  19.        httpBuilderMock.verify mockService
  20.     }
  21.  
  22. private void configureConfigurationHolder(){
  23.        def expando=new Expando()
  24.        expando.url=""
  25.        expando.path="test_payment.pl"
  26.        ConfigurationHolder.config=["moneybooker":expando]
  27.    }
  28.    
  29.    class DummyResponseWithCookie{
  30.        def headers
  31.        def init(){
  32.            def expando = new Expando()
  33.            expando.name="SESSION_ID"
  34.            expando.value="123123"
  35.            def outerExpando=new Expando()
  36.            outerExpando.elements=[expando]
  37.            headers=["Set-Cookie":outerExpando]
  38.        }

A lot of work. The main problems that I find are

First and most important. How do i Test closures?. In my case, i had to mock a response object (DummyResponseWithCookie) and because i knew what i wanted the closure to do, call the closure with that mock. But this doesn’t look good. I’m calling the closure in the demand of the mock of httpBuilder. So this test is testing more than what it should. But i don’t know how to test the closure on its own.

Second, the way to mock the configuration holder. Just setting static variables doesn’t seem very right.

Third. This is probably lack of practice but It took me longer to write this test, and was really difficult to think exactly what i wanted to achieve in my service, what needed to be mocked and in general how to approach it in a TDD way.

I really like Groovy, and Grails. I just don’t know how to approach TDD and Unit testing in general in a way that feels as comfortable as with Java.

Wednesday, January 26, 2011

Distributing Hadoop

As mentioned in the previous article Hadoop Basics the value of hadoop is in running it distributed in many machines.

In this article I will introduce the how-to configure Hadoop for distributed processing.
I’ll show how to do it with just to machines, but it will be the same for more as one of the main values of hadoop is the ability to scale easily.

1. Ok, so we download hadoop 0.21.0 from here http://mirror.lividpenguin.com/pub/apache//hadoop/core/hadoop-0.21.0/hadoop-0.21.0.tar.gz
in both machines. uncompress the file.

2. We have two inndependent Hadoops right now, but we want them to run in cluster. So we have to make some configuration.
Hadoop distributed works with 5 different daemons that communicate with each other. The daemons are:

NameNode: Is the main controller of the HDFS, it takes care of how the files are broken into blocks, which nodes contain each block and the general tracking of the distributed filesystem.

DataNode: This daemon serves the HDFS requirements of individual slave nodes communicating and coordinating with the NameNode.

Secondary NameNode: Takes snapshots of the NameNode for possible recoveries.

JobTracker: Is in charge of coordinating the task submissions to different nodes.

TaskTracker: Existent in each processing node, they are in charge of executing the tasks submited by the JobTracker, communicating with it constantly.

All communication between the hadoop is done through ssh. We will designate a Master Node (which will contain the NameNode and JobTracker) and two slave nodes. The master node must be able to communicate with the slave nodes through ssh using the same username. (I’m using my username cscarioni communicating without passphrase using private/public key authentication)

So as we are using two machines our architecture will be like this:
Machine 1 (Master) Machine 2 (Slave)
NameNode
JobTracker
Secondary NameNode
TaskTracker
DataNode

TaskTracker
DataNode


We go to our Master installation of hadoop, and enter the conf directory.

In the core-site.xml we specify the NameNode information. we put the following.

<?xml version="1.0"?>
<?xml-stylesheet type="text/xsl" href="configuration.xsl"?>
<configuration>
<property>
<name>fs.default.name</name>
<value>hdfs://master-hadoop:9000</value>
</property>
</configuration>


In the mapred-site.xml we specify where the job tracker daemon is:

<?xml version="1.0"?>
<?xml-stylesheet type="text/xsl" href="configuration.xsl"?>
<configuration>
<property>
<name>mapred.job.tracker</name>
<value>master-hadoop:9001</value>
</property>
</configuration>
In the hdfs-site.xml we specify the replication of the cluster. In our case 2:

<?xml version="1.0"?>
<?xml-stylesheet type="text/xsl" href="configuration.xsl"?>
<configuration>
<property>
<name>dfs.replication</name>
<value>2</value>
</property>
</configuration>

The masters and slaves files as they name says contains the names of the masters and slaves nodes. We have to modify them to include our master and slave nodes. (I defined in the hosts file of both machines the following host names.)

So in the masters we put

hadoop-master


And in the slaves we put

master-hadoop
carlo-netbook

we change now the hadoop-env.sh, uncommenting the JAVA_HOME line and point it to our JAVA_HOME.


Ok, these are all the files we need, we now distribute (copy) these files to both machines.


We go now to the bin node on the master node and execute ./hadoop namenode -format, to format the hdfs.

We execute now in the same directory: ./start-all.sh.

That’s it, we ran Hadoop. We now need to put some files in the HDFS and submit a map reduce task to it.

For this example i’ll use a custom made file that in each line has the word God or the Word Devil. I created the file with the following Groovy script

def a  = new File("/tmp/biblia.txt")
random = new Random()
a.withWriter{
    for (i in (0..5000000)){
        if(random.nextInt(2)){
            it << "GOD\n"
            }else{
            it << "Devil\n"
        }
    }
}


from the master’s hadoop bin directory, copy the file from the file system into hdfs with:

./hadoop fs -put /home/cscarioni/downloads/bible.txt bible.txt

to see that the file has been created do:

./hadoop fs -ls

I get the follwoing output

-rw-r--r-- 2 cscarioni supergroup 4445256 2011-01-24 18:25 /user/cscarioni/bible.txt

Now we create our MapReduce program (It just counts how many times the words GOD and Devil are in the file):


import java.io.IOException;
import java.util.StringTokenizer;
import org.apache.hadoop.conf.Configuration;
import org.apache.hadoop.fs.Path;
import org.apache.hadoop.io.IntWritable;
import org.apache.hadoop.io.LongWritable;
import org.apache.hadoop.io.Text;
import org.apache.hadoop.mapreduce.Job;
import org.apache.hadoop.mapreduce.Mapper;
import org.apache.hadoop.mapreduce.Reducer;
import org.apache.hadoop.mapreduce.lib.input.FileInputFormat;
import org.apache.hadoop.mapreduce.lib.input.KeyValueTextInputFormat;
import org.apache.hadoop.mapreduce.lib.output.FileOutputFormat;
import org.apache.hadoop.util.GenericOptionsParser;
public class GodVsDevils
{
    public static class WordMapper extends Mapper<LongWritable, Text, Text, LongWritable>
    {
        private LongWritable word = new LongWritable();
        private Text theKey = new Text();
        public void map(LongWritable key, Text value, Context context) throws IOException, InterruptedException
        {
            String who =value.toString();
            word.set(1);
            if(who.equals("GOD"))
            {
                theKey.set("God");
                context.write(theKey, word);
            }
            else if(who.equals("Devil"))
            {
                theKey.set("Devil");
                context.write(theKey, word);
            }
        }
    }
    public static class AllTranslationsReducer
    extends Reducer<Text,LongWritable,Text,LongWritable>
    {
        private LongWritable result = new LongWritable();
        public void reduce(Text key, Iterable<;LongWritable>; values,
        Context context
        ) throws IOException, InterruptedException
        {
            long count = 0;
            for (LongWritable val : values)
            {
                count += val.get();
            }
            result.set(count);
            context.write(key, result);
        }
    }
    public static void main(String[] args) throws Exception
    {
        Configuration conf = new Configuration();
        Job job = new Job(conf,"GodDevils");
        job.setJarByClass(GodVsDevils.class);
        job.setMapperClass(WordMapper.class);
        job.setReducerClass(AllTranslationsReducer.class);
        job.setOutputKeyClass(Text.class);
        job.setOutputValueClass(LongWritable.class);
        FileInputFormat.addInputPath(job, new Path("/user/cscarioni"));
        FileOutputFormat.setOutputPath(job, new Path("output"));
        System.exit(job.waitForCompletion(true) ? 0 : 1);
    }
}


We compile it , jar it and then execute the following in the master node:

./hadoop jar god.jar GodVsDevils -fs master-hadoop:9000 -jt master-hadoop:9001

This will run our map reduce in the hadoop cluster.

Monday, January 3, 2011

Building blocks of an Application Integration Framework

Based on my experience working with Mule ESB and Spring Integration, and reading about Open ESB and Service MIX, I realized that they are all based in almost the same concepts and ideas, ideas that come mainly from the book Enterprise Integration Patterns and its companion web site http://www.eaipatterns.com/
I’ll try to introduce here the main elements that constitute this integration frameworks (and ESBs) with main focus on the ones I know the most, Mule and Spring Integration but without implementation specifics.

I won’t get into details defining what an Integration Framework or an ESB are, as it’s not the point of this post. I’ll just say that they allow heterogeneous applications to communicate with one another, and that’s the basic concept.

For the next explanations I will refer to the Integration System in general as ESB although they are not necessarily the same.

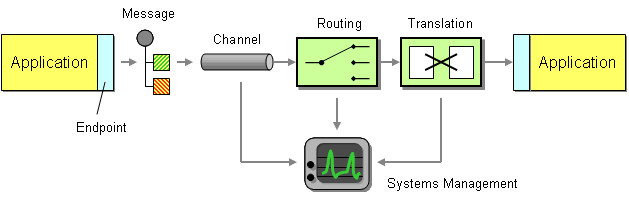
Here is a diagram from the EIP web site that shows the different elements I’m explaining later:


The main element is of course the Message. It’s what we want to send across from one system to another. Inside the ESB the messages are usually normalized and encapsulated in a framework specific message, that normally carries the payload of the message and meta-information headers. The message can suffer multiple transformations through the ESB.

A basic interface for a Message in an ESB could be something like:


interface Message<T> {
    T getPayload()
    Object getHeader(String key)
    void addHeader(String key,Object value)
}


The Transformers are in charge of transforming the messages. The transformation can be easy things like adding new headers to the message to more complex stuff like tottally changing the content format of the payload (for example from an XML Soap payload to an Email message). Transformer can be chained to apply more than one transformation to a message, but as a good practice each transformer should just do one only transformation.

A basic Transformer interface would be something like:


interface Transformer{
    Message transform(Message message);
}


The message channels are of course very important elements. Message channels are the links through which the messages pass in their way from one point to the next. Messages are sent to channels which transport them across the different stages in the ESB.
The two most common divisions of channels are synchronous and asynchronous channels. A Channel will usually have two methods one for sending messages, and one for polling for messages


interface Channel{
    void send(Message message);
    Message receive();
}


The Endpoints (also refered to as gateways). The endpoints can be as the connectors, or adapters, that plug the ESB to the outside systems and protocols to enable the communication. There are normally two type of endpoints. In-Endpoints for allow external systems to connect to the ESB and Out-Endpoints to allow the ESB to connect to the external systems.
In-Endpoints have the mission of taking the incoming messages, normalizing it into ESB messages and puting it into the ESB flow.
Out-Endpoint take the message from the ESB flow, strip the ESB message information into the payload and message type understood by the out system and send the message out (of course it can wait for a response and process it further).

Endpoint implementation is specific to the kind of application they want to connect to. For example a In-Endpoint for tcp would be totally different from an In-Endpoint for file systems. The tcp probably would create a Listening server socket and wait for conections, and the file system one would probably poll some folder looking for files.

However they both most convert their messages into an ESB Message and put it in the ESB flow. So a simple interface for and endpoint would be like:


interface Endpoint{
    /**
    * This method will take the Original message as a parameter(for example a InputStream
    *from a socket) wrap it in a ESB Message and put it into the ESB flow.
    */
    void send(Object object);
    /**
    * This method will receive the ESB Message from the ESB, strip the correct payload and
    *return it for it to be send to the external System
    */
    Object receive();
}


Filters and Routers control the flow in a ESB. A filter allows or stops Messages for being further processed based on arbitrary rules. A Router redirects Messages to different channels depending on arbitrary rules.

A simple Filter Base Class would be:


class Filter {
    public void filter(Message message){
        if(accept(message)){
            nextChannel.send(message);
        }
        else{
            discardChannel.send(message);
        }
    }
    protected abstract boolean accept(message);
}


A simple Router Base Class would be like


class Router {
    public void route(Message message){
        getNextChannelForMessage(message).send(message);
    }
    protected abstract Channel getNextChannelForMessage(message);
}


That’s it. These are the main building blocks on which an integration solution is built, of course there is a lot to learn from here. For more detailed information refer to the great projects Spring Integration,and Mule ESB, as well as the book Enterprise Integration Patterns
previously mentioned

Saturday, December 18, 2010

Understanding how Java Debug works

I found it surprising that many people that works with Java everyday doesn’t know that there are debugging options that go beyond clicking the “debug” button in your IDE.

You can just attach your IDE to a running application (which has been runned for debug as we’ll see later), or you can even debug it from command line. And the application you debug can even be be in a different machine.

The magic lies in where the debug information actually resides. Apparently people normally think that is the IDE that knows how to debug your programs, but the truth is that is the program who knows how to debug itself, and makes that information available to whoever wants to use it.

The way it works is basically the following. When you compile a program, the .class files get debug information within them, like line numbers or local variables that are made accessible to others who want to access this information. You can then run the program in debug mode passing the following options to your java program execution(you can of course run any java program like this, including mvn goals, appllication servers, etc)

-Xdebug -Xrunjdwp:transport=dt_socket,address=4000,server=y,suspend=y

(you can also use -agentlib:jdwp instead of -Xrunjdwp in latest Java versions)

This line basically says: Run this program in debug mode, use the jdwp protocol, with a socket that listens to port 4000 and waits for connections to continue.

The jdwp protocol is a communication protocol used by the Java application to receive and issue commands and reply to them.

For example, you can connect to this port when the application is running an issue commands like “print variablex” to know the value of a variable, “stop at x” to set a breakpoint, etc. The application issues notification commands like “breakpoint reached”.
The truth is that the protocol is a little more complex than this, but this is enough to know to illustriate the point.

With the previous said, we can see that it would be even possible to debug an application with the use of Telnet! (we'll see later)

Well, enough theory. Let’s see an example Any simple example will do. We’ll make a simple program that takes two parameters from command line and prints the sum. The program won’t be well designed (In the sense that will include some useless temp variables, no validations, etc) but will do to illustrate the example.


class Sum{
    public static void main(String[] args){
        int sum1 = Integer.parseInt(args[0]);
        int sum2 = Integer.parseInt(args[1]);
        int suma= sum1+sum2;
        System.out.println("La suma es "+suma);
    }
}


So we compile it: javac -g Sum.java (the g option adds extra debug info to the class. Like local variable names)
And we run it in debug mode: java -Xdebug -agentlib:jdwp=transport=dt_socket,address=4000,server=y,suspend=y Sum 3 4

Now we have the application listening on port 4000 waiting for connections

We will use the jdb command line debugger that comes with java. But first let’s try this. Run the following (you must run the second line fast after the telnet session starts)

telnet localhost 4000
JDWP-Handshake


That is the handshake to initiate the communication. You now have a debugging session with Telnet !

Ok, that was only to show, you (or i) would have to know the details of the jdwp protocol to use it. Let’s use instead jdb to debug our application. execute the following:

jdb -attach 4000

you’ll get some output like
Initializing jdb ...
>
VM Started: No frames on the current call stack

main[1]

That’s it, you have a debug session started. Now the interesting. Execute the following in your jdb session:

stop at Sum:6 You now have a breakpoint on line 6. execute run on the session, and the program will run until that breakpoint. you’ll get the output

Breakpoint hit: "thread=main", Sum.main(), line=6 bci=18
6 System.out.println("La suma es "+suma);


Now let’s see the value of our variables: run the following commands (one at a time) on the jdb session and see the results.

print sum1
print sum2
print suma
locals
set suma = 10
locals
cont


This is pretty cool stuff. You can debug your program from command line.

Of course if you have the opportunity to use an IDE like Eclipse you should take the advantage of it and still applying what you’ve learnt. So let’s do this.

You need to have the source code of the running application open in your eclipse as a eclipse project for this
Go to the step when you ran the program in debug mode. and run it.

Now go to your eclipse, go to the menu and select RUN -> DEBUG CONFIGURATIONS

In the left panel go to Java Remote Applications, and click new there.

Then select your project, write 4000 in the Port field, and click debug:


That’s it. you have attached your eclipse to the debugging program, now you can put breakpoints, do variable watches, and evaluate expressions from Eclipse.

That’s it. i hope this small article has helped you to understand a little better how the debugging of an application works and how you can debug and application that runs somewhere else.

For more Java Core information you can consult the good official book

Carlo

Sunday, December 12, 2010

Intro to Groovy closures for Java developers

People who is starting to work in Groovy usually comes from a Java background. And so they have to deal with the new (sometimes very different) features that the new language provides.

One of the new and different features of Groovy is Closures. Closures are a very powerful feature of Groovy, and one of the must deeply used, so they must definitely be understood to take full advantage of the language.

Sometimes people have trouble understanding closures, because there is no such construct in Java.However they are not really hard to understand, taking into account that Groovy is a 100% Object Oriented Language, and that it compiles to normal Java classes.

I will explain the basics of closures making a comparison between Code using closures, and showing (rather roughly) how this would translate into Java.

First a fast introduction.

A simple definition to Closures, is to say that they are language constructs that encapsulate behaviour, as functions, and can be referenced and passed around the code. Expressing it in Java terms they are like a Method without an associated class (We'll see later that this is not true) that can be referenced and passed around as an object.

The construct of a Closure in Groovy is like this:

{}

Yes, that's it, an open curly brace and the closing curly brace. That is the most simple closure, that actually doesn't do anything.

Closures can take parameters, like this {arg1->}. That closure receives one parameter and doesn't do anything.

A closure can for example return the double of it's argument {arg -> arg*2}

You pass a closure to a method as the last argument of the method without parentheses. For example we can have a method somewhere that receives a closure: def methodFoo(closureArg). And it can be called like
methodFoo{arg ->}

From this point, for the purpose of the explanation, we will use the each method on a Groovy List, which receives a closure as parameter and passes every element of the list to this closure.

Let's suppose we want to print de double of each element of a integer list.

[1,2,3,4].each{element -> print element*2}

That's it we printed the double of each element. To achieve the same in Java, and supposing that there exists an each method on java.util.List and that we already built our list with the four elements, it would be something like:


interface MethodObject{
void execute(Integer element); }

list.each(new MethodObject(){
    public void execute(Integer element){
    System.out.println(element * 2) }
})


As we can see, closures are a really nice way of implementing callbacks at the language level.

In the first case the each method will be something like:


each(closure){
    for(element in this){
    closure.call(element) }
}


the second case will look almost the same:


each(MethodObject callback){
    for(Integer element : this){
        callback.execute(element)
    }
}


Closures in groovy are actually objects of type groovy.lang.Closure. So the constructor def a = {arg ->} actually creates an object of type Closure, which as we can see have the method call.

A common source of confusion for closures is the scope of the variables around the closure. For me the best way to understand how this works is to think that at the time of the closure declaration, al visible variables are passed to the closure. For example, taking the previous example and this time multipliying the element by a number taken for the outer scope, we get the following.

def multiplier = 3
[1,2,3,4].each{element -> print element*multiplier}

We can see that the closure can access the reference multiplier and use it.

As objects, i think that what happens is something like the following(Of course this is not at all the way it is implemented, it's just a way to understand that the closures have access to the local variables in the scope where they there are declared):


Integer multiplier=3;

interface MethodObject{
    void execute(Integer element);
}
class MethodObjectImpl implements MethodObject{
    private Integer multiplier;
    public MethodObjectImpl(Integer multiplier){
        this.multiplier=multiplier;
    }
    public void execute(Integer element){
        System.out.println(element*multiplier)
    }
}

list.each(new MethodObjectImpl(multiplier));


As we can see, the local variable "multiplier" would be passed to the declaration of the closure object, so that it "remembers" the variable when it is executed.

So, i think that the most important thing to remember about closures is that they are a very convenient way of expressing callbacks, that they are objects (even although syntactically they don't look like it), and that they remember the variables on their out local scope.

Saturday, November 13, 2010

Using tcpdump and wireshark for debugging

In some of the projects i have worked on i have seen myself in the need of integrating with external systems, in most cases via Web Services, Rest or Soap.

The integration with these external services is usually done with the use of framework help. For example in a couple of projects I used WebServiceTemplate. In other project i had Mule ESB calling to a Web Service Endpoint, etc.

In most cases I pass a pojo to a method and the framework takes care of everything, marshalling, adding headers, sending. And in some cases the debug info that the framework outputs is not enough to see what is going on the wire. I need to see the actual message i’m sending or receiving from the remote host.

For this cases i use tcpdump for capturing traffic, and Wireshark for displaying it. I explain how to do this:

Let’s suppose we are connecting to the Calculator Web Service in

http://soatest.parasoft.com/calculator.wsdl

We want to see the exact contents of our request as it leaves our network interface.

we go to a shell window and execute the following as root

tcpdump -i wlan0 -w /tmp/xxx.dmp -s 1500 dst ws1.parasoft.com

where wlan0 is the network interface in use, /tmp/xxx.dmp the file where we are storing the output, 1500 the capture packet size, and ws1.parasoft.com the destination address for filtering the packets sent (Only packets with this destination will be captured by tcpdump)

We then execute our code that makes the request (In this example i’m doing the request with soapUI, calling the operation add on the web service).

After doing the operation, we terminate the running tcpdump, go to wireshark and open the file /tmp/xxx.dmp. And we see the following:


We can now click on the line with the Protocol HTTP/XML and see the contents of the soap xml message, the http headers, etc:


This way, we have a complete knowledge of what is going on the wire, and maybe this knowledge helps us to debug some problems that can be harder to debug without this knowledge.

Carlo

Thursday, November 11, 2010

Hadoop Basics

This summary is not available. Please click here to view the post.