Friday, October 11, 2013

Checking Jquery Ajax requests from Capybara

I was working in a particular feature today. I wanted to test an autocomplete input box that makes its requests via Ajax. Something very common.

I wanted to test that the requests were being done to the right URL in a black box kind of way using the cucumber features.

This is what I did:

  • First added a new visit method visit_tracking_ajax to my Cucumber environment with the following content

    module CucumberGlobals
     def visit_tracking_ajax(url)
      visit(url)
      page.execute_script("$(document).ajaxSuccess(function(a,b,c){console.log(this);window._latest_ajax_url_called = c.url;})")
     end
    end
    
    World(CucumberGlobals)
    

This executes a Javascript Jquery script in the page that will listen to every Ajax request being made (through Jquery) and set a variable on window with the URL called in that request.

  • Then from my step definition I did something like:

    page.latest_ajax_url.should == 'http://www.xx.xxx'
    
  • Having also added the following method to the Capybara session:

    module CustomMethods
     def latest_ajax_url
       evaluate_script("window._latest_ajax_url_called")
     end
    end
    
    module Capybara
      class Session
        include CustomMethods
      end
    end
    

That's it, now I was checking the last ajax url being called. This is fragile code, but it worked fine for my current use case.

Monday, October 7, 2013

Simple setup for testing MongoDB map reduce with Ruby

Simple setup for testing MongoDB map reduce with Ruby

This is a superquick tutorial to running Mongo Map Reduce aggregations from Ruby. This is as simple as it gets. A MongoDB running locally and a unique Ruby script. For the test I created the follwoing simple collection in a Mongo DB called example

> db.values.find()
  { "_id" : ObjectId("52530971a1b6dd619327db27"), "ref_id" : 1, "value" : 2 }
  { "_id" : ObjectId("5253097ba1b6dd619327db28"), "ref_id" : 1, "value" : 4 }
  { "_id" : ObjectId("52530983a1b6dd619327db29"), "ref_id" : 2, "value" : 10 }
  { "_id" : ObjectId("52530989a1b6dd619327db2a"), "ref_id" : 2, "value" : 15 }
  { "_id" : ObjectId("52531414a1b6dd619327db2b"), "ref_id" : 3, "value" : 100 } 

Then I created a simple Ruby project with the only entry gem "mongoid" in the Gemfile.

The following mongo.yml configuration file:

development:
  sessions:
    default:
      database: mongoid
      hosts:
        - localhost:27017

The Ruby script is then

require 'mongoid'
Mongoid.load!("/Users/cscarioni/ossources/mongo_map_reduce/mongo.yml")

session = Moped::Session.new([ "127.0.0.1:27017"])

session.use :example

map = %q{
  function() {
    emit(this.ref_id,{value: this.value});
  }
}

reduce = %q{
  function(key, values) {
    var value_accumulator = 0;
    values.forEach(function(val){
    value_accumulator += val.value
  });
   return {val: value_accumulator} 
  }
}


puts session.command(
  mapreduce: "values",
  map: map,
  reduce: reduce,
  out: { inline: 1 }
)

When running the script, we get the following results:

 MONGOID_ENV=development ruby mongo_map_reduce.rb


{
  "results"   =>   [
    {
       "_id"         =>1.0,
       "value"         =>         {
          "val"            =>6.0
       }
    },
    {
       "_id"         =>2.0,
       "value"         =>         {
          "val"            =>25.0
       }
    },
    {
       "_id"         =>3.0,
       "value"         =>         {
          "value"            =>100.0
       }
    }
 ],
  "timeMillis"   =>13,
  "counts"   =>   {
    "input"      =>5,
    "emit"      =>5,
    "reduce"      =>2,
    "output"      =>3
  },
  "ok"   =>1.0
}

That's it. A quick example. Sometimes it is more convenient to use a Ruby script than deal with the Mongo Json shell interface.

Sunday, September 15, 2013

Analyzing your Mongo data with Pig

MongoDB offers a fantastic query interface, however sometimes in Big Data scenarios we may want to combine our MongoDB database with the processing power of Hadoop in order to extract and analyze the data stored in our DB.

Working with Hadoop directly doing Map Reduce jobs is all great and nice, however sometimes we may want or need a simpler and more straightforward interface to execute our analisys jobs. Here is where Apache Pig comes in.

What is so good about Pig is that it offers a nice abstraction on top of map reduce that takes away some of the inherent complexity of programming with this paradigm and instead offers a high level language to achieve our analysis tasks. Pig then translates this high level descriptions into the proper map reduce jobs.

What I will show next is how to integrate (in the simples possible scenario all running in localhost) Pig to extract and analyze data from your Mongo database and store the results back into Mongo.

The example

The example will be a very simplistic insurance policy storage analysis application. Basically we will have a couple of simple MongoDB collections which we will aggregate together and run some analysis on them. The collections we have are:

> show collections
    policies
    providerType

with the following contents:

> db.policies.find()
   { "_id" : ObjectId("5235d8354d17d7080dbd913f"), "provider" : "ic1", "price" : 50 }
   { "_id" : ObjectId("5235d8434d17d7080dbd9140"), "provider" : "ic1", "price" : 200 }
   { "_id" : ObjectId("5235d84d4d17d7080dbd9141"), "provider" : "ic2", "price" : 400 }
   { "_id" : ObjectId("5235d8524d17d7080dbd9142"), "provider" : "ic2", "price" : 150 }

The policies collection have a list of documents informing of sold policies, the insurance provider and the price they were sold for.

> db.providerType.find()
   { "_id" : ObjectId("5235e85794eeca389060cd40"), "provider" : "ic1", "type" : "premium" }
   { "_id" : ObjectId("5235e86194eeca389060cd41"), "provider" : "ic2", "type" : "standard" }

The providerType collection has the type of the particular insurance provider. As example there is premium provider and standard provider.

Our analysis process will simply offer an average of the price spend by buying the premium policies. For that is obvious that we will need a grouping and an aggregation.

Setting up

For the example we will need the following:

After you download (or clone) all the needed software, you proceed to do the following:

  • Build mongo_hadoop: From the root of the cloned repository, after checking out the r1.1.0 tag, execute ./sbt package. This will build the needed jar files for us.
  • From the previous step you would normally need to copy a couple of Jar files to your hadoop environment if we were using full hadoop. However as we will be using just local run of Pig, this is not needed.

You need to have configured some enviornment variables, in particular JAVA_HOME and PATH. I have the following in my .bash_profile:

if [ -f ~/.bashrc ]; then
 . ~/.bashrc
fi
PATH=$PATH:$HOME/bin:/home/vagrant/Programs/pig-0.11.1/bin
export PATH
export JAVA_HOME=/usr/java/default/
export PIG_HOME=/home/vagrant/Programs/pig-0.11.1/

Next you will need the actual Pig script file. Contents below:

REGISTER /home/vagrant/Programs/pig-0.11.1/contrib/piggybank/java/piggybank.jar
REGISTER /home/vagrant/Programs/pig-0.11.1/pig-0.11.1.jar
REGISTER  /home/vagrant/Downloads/mongo-java-driver-2.11.3.jar
REGISTER /home/vagrant/ossources/mongo-hadoop/core/target/mongo-hadoop-core-1.1.0.jar
REGISTER /home/vagrant/ossources/mongo-hadoop/pig/target/mongo-hadoop-pig-1.1.0.jar

raw_providers = LOAD 'mongodb://localhost:27017/insurance_example.policies' using com.mongodb.hadoop.pig.MongoLoader;
raw_provider_types = LOAD 'mongodb://localhost:27017/insurance_example.providerType' using com.mongodb.hadoop.pig.MongoLoader;


with_names = FOREACH raw_providers GENERATE $0#'provider' as provider, (double)$0#'price' as price;
types = FOREACH raw_provider_types GENERATE $0#'provider' as provider, $0#'type' as type;
premiums = FILTER types BY type == 'premium';

by_provider = COGROUP with_names BY provider, premiums BY provider INNER;

averages = FOREACH by_provider GENERATE group, AVG(with_names.price) as avg;

STORE averages
  INTO 'mongodb://localhost:27017/insurance_example.premium_policies_averages'
  USING
  com.mongodb.hadoop.pig.MongoInsertStorage('group:chararray,avg:float', 'group');

This is the file where all the magic happens,to run the file, assuming you called the file insurance.pig as I did, simply execute pig -exectype local -f insurance.pig.

After you run the file, and after a substantial output, you can go to your MongoDB and check the new collection:

> db.premium_policies_averages.find()
  { "_id" : ObjectId("5235f2490cf24ccadbf9638a"), "group" : "ic1", "avg" : 125 }

You can see that it has now stored the average price for all the premium policy providers, in our example the only premium provider is ic1.

Let's have a quick walkthrough over the insurance.pig file

  • The first five lines (The ones starting with REGISTER) simply add the necesary dependencies to the CLASSPATH of the Pig job we are going to run. In this case is worth noting that we are adding the jars from the Mongo Java Driver that we downloaded and the ones we built from the mongo_hadoop project that we cloned from Github.
  • The next 2 lines (statrting with LOAD) loads the data from the necesary mongo collections into their respective relation.
  • In the next 2 lines (start with FOREACH) we give names to the raw data we extracted before for future access.
  • The next line (starts with FILTER) filters the types to only the ones whose type equals 'premium'
  • The next line (starts with COGROUP) creates a combined group between the provider/price touples and the premium providers grouped by provider name.
  • The next line generates the tuples with the corresponding averages.
  • The last part of the script stores the generated tuples into the MongoDB collection, specyfying the type of the data stored.

And that's it. This is a very simplistic example, runnign with very little data and in a local non-distributed environment. However it serves to illustrate how to use the power of Hadoop and Pig to extract and analyze data from MongoDB.

  • I created a Vagrant box with the example which can be downloaded here
  • P.D. Although we did not install Hadoop per se, because it is not needed to install it when running Pig in local mode, Hadoop map-reduce functionality is still used internally by Pig to execute the jobs that we create.

    Monday, July 29, 2013

    Javascript for Java developers 1.Lack of Classes. Instantiating objects

    Lack of classes. Instante objects:

    I have been working mostly in Java in my 9 years development experience. On those years I have worked with many other Java developers and one of the things that many of them have in common is that they don’t like (sometimes even hate Javascript).

    I admit that Javascript has never been my favorite language either, but I do admit that it is a powerful and ever more useful language to know and understand.

    This quick tutorial will try to explain some of the points I think make Java developers feel that they hate Javascript.

    1. Lack of Classes. Instantiating objects
    2. Inheritance and Encapsulation
    3. Package and organizing code
    4. Functional programming and callback functions

    In this first Post I will talk about point number 1.

    Lack of Classes, instantiate objects

    In Java everything we program exists within a class, even the simplest of programs need a class. Classes are used more than anything else as a blueprint for the instantiation of objects. The following code shows a simple class in java:

    class Simple {
      private String propertyA;
      private String propertyB;
    
      public Simple(String a, String b){
        this.propertyA = a;
        this.propertyB = b;
      }
    
      public String concatenateAandB(){
        return propertyA + propertyB;
      }
    }
    

    In the previous chunck of code we have created a very simple Java class. This class has one explicit constructor a couple of properties and a public method. In order to use it we would do something like:

    Simple instance = new Simple("hello ", "world");
    System.out.println(instance.concatenateAandB());
    

    That would print hello world to the console. So how would we do something as simple as that with Javascript. First of all let's remember that there is no such thing as classes in Javascript. However he previous code is easily reproducible in Javascript. I'll show the code and then explain how it works:

    function Simple(a, b) {
      var propertyA = a;
      var propertyB = b;
    
      this.concatenateAandB = function() {
        return propertyA + propertyB;
      }
    }
    

    The way to execute this is very similar to the Java version. We create and instance and call the method:

    var instance = new Simple("hello", "world");
    console.log(instance.concatenateAandB());
    

    As you can see the functionality here is very similar, the main difference is that instead of having a class and a constructor for that class, we have an isolated function that by convention starts with a capital letter when we want it to work as a constructor (there is nothing appart from the convention that stop us from doing function simple(a, b) {). Simple is a standard Javascript function. However as you can see we called it in a non-conventional way using the new keyword. You could call this function like Simple("hello", "world") as the following chunck of code shows:

    Simple("hello ", "world");
    console.log(window.concatenateAandB());  
    

    In this second scenario we can see that we are not creating a new instance with new, instead we are calling the function directly as any other Javascript function. This has the effect of calling the function using the current object as the this object (in this case the window object). When using the new keyword, instead of using the current object as this, a new empty object is created and that one is used as the context in the function. Also when using new the created instance object is returned by the method call.

    This is one of the most important things to know when working with objects in Javascript. The functions behave differently when called using new or when not using new. In the first case a new empty object ({}) is created and used as the this context inside the function. When the function is called without the new keyword, the current this object (the window if you are calling from the top level) that current object is used as the context inside the function and no new instance is created.

    This makes Javascript a bit confusing when creating objects and not having real difference between a standard function and a constructor function. Also it is strange that constructor functions can live all on their own while in Java they are logically living inside class definitions.

    In the next Post I will explore how Javascript deals with inheritance and encapsulation, and compare it to Java as I just did here.

    Wednesday, April 17, 2013

    Pro Spring Security and OAUTH 2

    OAuth and Spring Security

    My upcoming Pro Spring Security is heavily focused on the inner workings of the Spring Security core framework and how everything fit together under the hood.

    And although I do cover very important providers for authentication and authorization (including LDAP, Database, CAS, OpenID, etc) I don’t cover another important provider which is OAuth. The reason it is not covered in the book is because it is not part of the core of Spring Security but instead it is part of the Spring Security extensions project. However I know OAuth is a very popular authorization protocol and I will cover it here as a complement to the information on the book.

    In this Post I want to introduce you to using OAuth with Spring Security. Many of the concepts will not be straightforward to understand, and I recommend you to read the book Pro Spring Security to understand the architecture and design of Spring Security and how it works internally.

    First let’s take an overall look at the OAuth 2 protocol. I won’t be talking anything about the original OAuth 1 in this post.

    OAuth 2 is an authorization protocol that specifies the ways in which authorization can be granted to certain clients to access a determined set of resources.

    Directly taken from the specification, we can see in the following paragraph that OAuth 2 defines a specific set of Roles interacting in the security process:

    resource owner
         An entity capable of granting access to a protected resource.
         When the resource owner is a person, it is referred to as an end-
         user.
     
    resource server
         The server hosting the protected resources, capable of accepting
         and responding to protected resource requests using access tokens.
     
    client
         An application making protected resource requests on behalf of the
         resource owner and with its authorization.  The term client does
         not imply any particular implementation characteristics (e.g.
         whether the application executes on a server, a desktop, or other
         devices).
     
    authorization server
         The server issuing access tokens to the client after successfully
         authenticating the resource owner and obtaining authorization.

    The overall interaction that happens in the protocol is also specified in the specification, and it goes something like this:

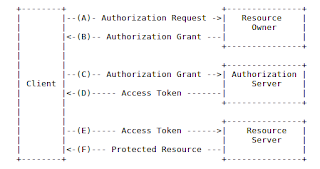
    You can see the interaction between the 4 roles defined by the protocol.

    The main idea to take in mind in the traditional scenario is that an application (the Client) will try to access another application’s secured resources (Resource Server) in the name of a user (Resource Owner). In order to do so, the user needs to prove its identity, and to do so it contacts the Authorization Server presenting its credentials. The Authorization Server authenticates the user and grants the client/user combination a token that can be used to access the particular resource. In many cases the Authorization Server and Resource Server live in the same place. For example if you try to access your facebook account from another application, you will get redirected to the facebook login (Authorization Server) and then you will grant certain permissions to be able to access your facebook wall (a resource in the Resource Server).

    Ok, let’s see how all that fits in the Spring Security OAuth project. There will be a couple of things that don’t work exactly the way that sites like Facebook or Twitter work, but we get to that later.

    I will create both a OAuth service provider (Authentication Server but also Resource Server) and a OAuth client (Client Application) The first thing I’ll do is to check out the source of the project from Github, which I normally do with open source projects.

    git clone git://github.com/SpringSource/spring-security-oauth.git

    Then checkout the latest stable tag with git checkout 1.0.1.RELEASE

    Next we will be playing with the OAuth 2 samples that come with the project.

    I build everything with the command mvn clean install -P bootstrap

    We will then open the project sparklr in the samples/oauth2 folder. This project will serve as both the Authorization Server and Resource Server from our previous definitions. Sparklr is a project that offers pictures secured with OAuth.

    We will also open the tonr application in the same directory. This is the OAuth client application.

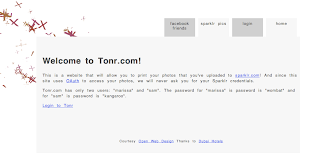
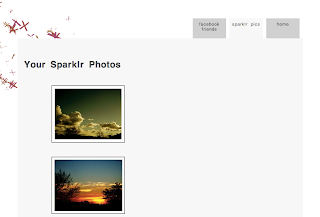
    Both projects are built from the previous maven build step. I took both war files and copy them to a Tomcat 7’s webapps directory that I have in my computer under the names sparklr2.war and tonr2.war. The I started Tomcat and visited the address http://localhost:8080/tonr2/. I was received by the page in the following figure:

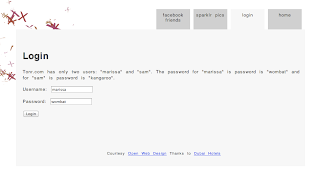
    If I click in the “sparklr pics” tab I am presented with a login screen particular to the tonr application (The Client in this case has a password of its own):

    I login with the default username and password and I am redirected to the sparklr login screen now.

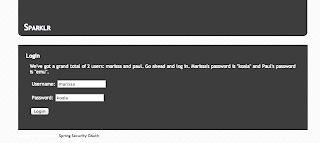
    Remember this is the Authorization Server as well as the Resource Server, where the resources are pictures.

    Again I login with the default username and password. This will ask for confirmation that I am allowing Tonr to access my personal resources on my behalf.

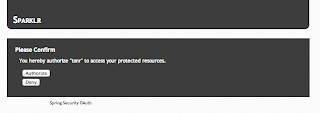
    I click on Authorize. I am redirected back to Tonr and now I can see my pictures stored on Sparklr.

    Ok, that is the functionality working. Now let’s see how it all happens under the hood.

    When we visit the URL http://localhost:8080/tonr2/sparklr/photos by clicking on the tab, the request will arrive at the filter OAuth2ClientContextFilter which is defined by the xml namespaced element <oauth:client id="oauth2ClientFilter" /> in the spring-servlet.xml of the tonr project, which is referenced in the <http> element at the top of said file. Like this:

    <http access-denied-page="/login.jsp?authorization_error=true" xmlns="http://www.springframework.org/schema/security">

                    <intercept-url pattern="/sparklr/**" access="ROLE_USER" />

                    <intercept-url pattern="/facebook/**" access="ROLE_USER" />

                    <intercept-url pattern="/**" access="IS_AUTHENTICATED_ANONYMOUSLY" />

                    <form-login authentication-failure-url="/login.jsp?authentication_error=true" default-target-url="/index.jsp"

                            login-page="/login.jsp" login-processing-url="/login.do" />

                    <logout logout-success-url="/index.jsp" logout-url="/logout.do" />

                    <anonymous />

                    <custom-filter ref="oauth2ClientFilter" after="EXCEPTION_TRANSLATION_FILTER" />

            </http>

    You can see that the access needed for accessing anything with the URL /sparklr/** requires a user with Role ROLE_USER. That means that when trying to access that URL before being logged in an AccessDeniedException will be thrown. The AccessDeniedException will be catched by the OAuth2ClientContextFilter which won’t do anything at all with this exception but rethrow it to be handled by the standard exception handling process of Spring Security.

    The application is automatically redirected to the login.jsp.

    After we login and still trying to reach the URL /sparklr/photos, the OAuth2ClientContextFilter is reached again. The request will get all the way through the SparklrServiceImpl which is the service in charge of reaching to Sparklr to retrieve the photos. This class will use a RestOperations instance (in particular an instance of OAuth2RestTemplate) to try to retrieve the photos from the remote Sparklr service using the following URL http://localhost:8080/sparklr2/photos?format=xml

    This is what the OAuth2RestTemplate does internally when trying to contact the given URL:

    This is what the OAuth2RestTemplate does internally when trying to contact the given URL:

    It will first try to obtain the Access Token (in the form of an instance of OAuth2AccessToken) from the client context. In particular from the configured DefaultOAuth2ClientContext.

    As we still don't have any access token for Sparklr, there is nothing stored on the DefaultOAuth2ClientContext. So the access token will be null at this point.

    Next a new AccessTokenRequest will be obtained from the DefaultOAuth2ClientContext. The AccessTokenRequest and the DefaultOAuth2ClientContext are configured automatically by Spring at startup by the use of the namespaced bean definition <oauth:rest-template resource="sparklr" />. That definition will be parsed by the class RestTemplateBeanDefinitionParser.

    Next as there is no access token on the context, an instance AccessTokenProvider will be used to try and retrieve the token. In particular an instance of AccessTokenProviderChain will be used. The AccessTokenProviderChain’s obtainAccessToken method will be called with the AccessTokenRequest and a AuthorizationCodeResourceDetails instance. This instance is configured by the resource attribute in the <oauth:rest-template> bean that references a <oauth:resource> element. Like this:

    <oauth:resource id="sparklr" type="authorization_code" client-id="tonr" client-secret="secret"

                    access-token-uri="${accessTokenUri}" user-authorization-uri="${userAuthorizationUri}" scope="read,write" />

    <oauth:rest-template resource="sparklr" />

    The <oauth:resource> element will be parsed by the class ResourceBeanDefinitionParser at startup. In this particular case this will create an instance of the class AuthorizationCodeResourceDetails. In this instance, preconfigured client-id and client-secret will be set. Also configured in this instance are the required URLs for authenticating and requesting the Access Token.

    The AccessTokenProviderChain’s obtainAccessToken method will go through the configured AccessTokenProvider instances to try and obtain the token. In the current example the only configured AccessTokenProvider is an instance of AuthorizationCodeAccessTokenProvider. This class will try to make a POST call to the URL http://localhost:8080/sparklr2/oauth/authorize to get the authorization code for this client/user.

    The call to the /sparklr2/oauth/authorize endpoint will arrive on the FilterSecurityInterceptor for the Sparklr application. The interceptor will notice that the required URL requires a user with role ROLE_USER (in Sparklr) to be logged in to be able to access the contents from this endpoint. This is enforced by the following chunk of XML in the spring-servlet.xml of the Sparklr application (In particular look at the line that intercepts the URL “/oauth/**”):

    <http access-denied-page="/login.jsp?authorization_error=true" disable-url-rewriting="true"

                    xmlns="http://www.springframework.org/schema/security">

                    <intercept-url pattern="/oauth/**" access="ROLE_USER" />

                    <intercept-url pattern="/**" access="IS_AUTHENTICATED_ANONYMOUSLY" />

                    <form-login authentication-failure-url="/login.jsp?authentication_error=true" default-target-url="/index.jsp"

                            login-page="/login.jsp" login-processing-url="/login.do" />

                    <logout logout-success-url="/index.jsp" logout-url="/logout.do" />

                    <anonymous />

            </http>

    When the interceptor realizes that the security constraint is not met, it will throw an AccessDeniedException. This exception will be picked up by the ExceptionTranslationFilter which will at the end of a couple more redirections, will redirect to the URL http://localhost:8080/sparklr2/login.jsp.

    This redirect will be received by the AuthorizationCodeAccessTokenProvider in the Tonr application which will then throw the exception UserRedirectRequiredException. That exception will be then be captured by the Oauth2ClientContextFilter which will make the call to the redirect URL returned by Sparklr and adding the required extra parameters. Something like: http://localhost:8080/sparklr2/login.jsp?response_type=code&client_id=tonr&scope=read+write&state=dWby7l&redirect_uri=http%3A%2F%2Flocalhost%3A8080%2Ftonr2%2Fsparklr%2Fphotos

    We are presented now with the login form for Sparklr. When we click on the login button, the following happens:

    Username and password will be send to the URL /sparklr2/login.do. This URL is configured to be managed by the UsernamePasswordAuthenticationFilter when the attribute login-processing-url="/login.do" is configured on the <form-login> element. The UsernamePasswordAuthenticationFilter will extract the username and password from the request and will call the ProviderManager implementation of AuthenticationManager.

    The AuthenticationManager will find the DaoAuthenticationProvider that is configured with in memory user details thanks to the XML element show next:

            <authentication-manager alias="authenticationManager" xmlns="http://www.springframework.org/schema/security">

                    <authentication-provider>

                            <user-service id="userDetailsService">

                                    <user name="marissa" password="koala" authorities="ROLE_USER" />

                                    <user name="paul" password="emu" authorities="ROLE_USER" />

                            </user-service>

                    </authentication-provider>

            </authentication-manager>

    The DaoAuthenticationProvider will be able then to find the user marissa with the corresponding role ROLE_USER and authenticate her.

    After succesfully authenticating in Sparklr, the framework redirects to the  /sparklr2/oauth/authorize URL that was previously requested. This time access to the endpoint will be granted for the user that had just logged in.

    The /oauth/authorize request in Sparklr is handled by the class org.springframework.security.oauth2.provider.endpoint.AuthorizationEndpoint that comes with the installation of the core Spring Security OAuth project. The use of this endpoint class is configured automatically when the following XML configuration is used:

    <oauth:authorization-server client-details-service-ref="clientDetails" token-services-ref="tokenServices"

                    user-approval-handler-ref="userApprovalHandler">

                    <oauth:authorization-code />

                    <oauth:implicit />

                    <oauth:refresh-token />

                    <oauth:client-credentials />

                    <oauth:password />

            </oauth:authorization-server>

    When that xml element (<oauth:authorization-server> ) is used, many things happen when it is parsed by the class AuthorizationServerBeanDefinitionParser which is a complex parser that handles many different elements and options. Some of them we will see later, but for now we are only looking at the AuthorizationEndpoint.

    The AuthorizationEndpoint maps the request /oauth/authorize as I have just said before. The first thing it will do is to check the kind of petition that the client is doing, basically looking at the request param response_type and checking if its value is either “code” or “token” to know if an authorization code or an access token is being requested. For the current call, the value of this parameter is “code” as you may remember.

    The next thing that will happen is that the AuthorizationEndpoint will create an instance of org.springframework.security.oauth2.provider.AuthorizationRequest. The main part of the AuthorizationRequest, is the use of the clientId parameter to retrieve the client details of the connecting client. In this requets, the clientId is “tonr” and the details are retrieved from an InMemoryClientDetailsService that get configured by the XML element:

    <oauth:client-details-service id="clientDetails">

                    <oauth:client client-id="my-trusted-client" authorized-grant-types="password,authorization_code,refresh_token,implicit"

                            authorities="ROLE_CLIENT, ROLE_TRUSTED_CLIENT" scope="read,write,trust" access-token-validity="60" />

                    <oauth:client client-id="my-trusted-client-with-secret" authorized-grant-types="password,authorization_code,refresh_token,implicit"

                            secret="somesecret" authorities="ROLE_CLIENT, ROLE_TRUSTED_CLIENT" />

                    <oauth:client client-id="my-client-with-secret" authorized-grant-types="client_credentials" authorities="ROLE_CLIENT"

                            scope="read" secret="secret" />

                    <oauth:client client-id="my-less-trusted-client" authorized-grant-types="authorization_code,implicit"

                            authorities="ROLE_CLIENT" />

                    <oauth:client client-id="my-less-trusted-autoapprove-client" authorized-grant-types="implicit"

                            authorities="ROLE_CLIENT" />

                    <oauth:client client-id="my-client-with-registered-redirect" authorized-grant-types="authorization_code,client_credentials"

                            authorities="ROLE_CLIENT" redirect-uri="http://anywhere?key=value" scope="read,trust" />

                    <oauth:client client-id="my-untrusted-client-with-registered-redirect" authorized-grant-types="authorization_code"

                            authorities="ROLE_CLIENT" redirect-uri="http://anywhere" scope="read" />

                    <oauth:client client-id="tonr" resource-ids="sparklr" authorized-grant-types="authorization_code,implicit"

                            authorities="ROLE_CLIENT" scope="read,write" secret="secret" />

            </oauth:client-details-service>

    As you can see in the XML chunk, “tonr” is configured as a client. When we retrieve the details of the client we get an instance of the ClientDetails object. ClientDetails source is shown next:

    package org.springframework.security.oauth2.provider;

    import java.io.Serializable;

    import java.util.Collection;

    import java.util.Map;

    import java.util.Set;

    import org.springframework.security.core.GrantedAuthority;

    /**

     * Client details for OAuth 2

     *

     * @author Ryan Heaton

     */

    public interface ClientDetails extends Serializable {

            /**

             * The client id.

             *

             * @return The client id.

             */

            String getClientId();

            /**

             * The resources that this client can access. Can be ignored by callers if empty.

             *

             * @return The resources of this client.

             */

            Set<String> getResourceIds();

            /**

             * Whether a secret is required to authenticate this client.

             *

             * @return Whether a secret is required to authenticate this client.

             */

            boolean isSecretRequired();

            /**

             * The client secret. Ignored if the {@link #isSecretRequired() secret isn't required}.

             *

             * @return The client secret.

             */

            String getClientSecret();

            /**

             * Whether this client is limited to a specific scope. If false, the scope of the authentication request will be

             * ignored.

             *

             * @return Whether this client is limited to a specific scope.

             */

            boolean isScoped();

            /**

             * The scope of this client. Empty if the client isn't scoped.

             *

             * @return The scope of this client.

             */

            Set<String> getScope();

            /**

             * The grant types for which this client is authorized.

             *

             * @return The grant types for which this client is authorized.

             */

            Set<String> getAuthorizedGrantTypes();

            /**

             * The pre-defined redirect URI for this client to use during the "authorization_code" access grant. See OAuth spec,

             * section 4.1.1.

             *

             * @return The pre-defined redirect URI for this client.

             */

            Set<String> getRegisteredRedirectUri();

            /**

             * Get the authorities that are granted to the OAuth client. Note that these are NOT the authorities that are

             * granted to the user with an authorized access token. Instead, these authorities are inherent to the client

             * itself.

             *

             * @return The authorities.

             */

            Collection<GrantedAuthority> getAuthorities();

            /**

             * The access token validity period for this client. Null if not set explicitly (implementations might use that fact

             * to provide a default value for instance).

             *

             * @return the access token validity period

             */

            Integer getAccessTokenValiditySeconds();

            /**

             * The refresh token validity period for this client. Zero or negative for default value set by token service.

             *

             * @return the refresh token validity period

             */

            Integer getRefreshTokenValiditySeconds();

            /**

             * Additional information for this client, not neeed by the vanilla OAuth protocol but might be useful, for example,

             * for storing descriptive information.

             *

             * @return a map of additional information

             */

            Map<String, Object> getAdditionalInformation();

    }

    After the AuthorizationRequest object is created, it is checked to see if it has been approved. As it is just created, it has not been yet approved and the AuthorizationEndpoint will forward the request to the URL forward:/oauth/confirm_access which is internally configured by default in the framework.

     The confirm_access URL needs to be handled in the application that we are using as authentication server, which is in this case is the Sparklr application. So in the Sparklr application the AccessConfirmationController is in charge of handling the request to the /oauth/confirm_access URL. It handles this URL by showing the page access_confirmation.jsp that contains the form for authorizing or denying access to the tonr client to the sparklr server

    Now when you click on Authorize, the following happens:

    A POST call is made to the URL /oauth/authorize in the Sparklr application. This call is handled by the class org.springframework.security.oauth2.provider.endpoint.AuthorizationEndpoint, in particular by the approveOrDeny method.

    The approveOrDeny method will extract the AuthorizationRequest that is requesting access. The AuhtorizationRequest interface looks like:

    package org.springframework.security.oauth2.provider;

    import java.util.Collection;

    import java.util.Map;

    import java.util.Set;

    import org.springframework.security.core.GrantedAuthority;

    /**

     * Base class representing a request for authorization. There are convenience methods for the well-known properties

     * required by the OAUth2 spec, and a set of generic authorizationParameters to allow for extensions.

     *

     * @author Ryan Heaton

     * @author Dave Syer

     * @author Amanda Anganes

     */

    public interface AuthorizationRequest {

            public static final String CLIENT_ID = "client_id";

            public static final String STATE = "state";

            public static final String SCOPE = "scope";

            public static final String REDIRECT_URI = "redirect_uri";

            public static final String RESPONSE_TYPE = "response_type";

            public static final String USER_OAUTH_APPROVAL = "user_oauth_approval";

            public Map<String, String> getAuthorizationParameters();


            public Map<String, String> getApprovalParameters();

            public String getClientId();

            public Set<String> getScope();

            public Set<String> getResourceIds();

            public Collection<GrantedAuthority> getAuthorities();

            public boolean isApproved();

            public boolean isDenied();

            public String getState();

            public String getRedirectUri();

            public Set<String> getResponseTypes();

    }

    The redirectUri is extracted and the approval process is evaluated again, this time approving the AuthorizationRequest.

    The request is also evaluated to make sure it is requesting the authorization code (by calling the method getResponseTypes on the AuthorizationRequest) and not the token. The framework will generate a new authorization code as requested. Then the approveOrDeny method will finish its work by returning a new instance of RedirectView that will be handled as a redirection back to the tonr application. In particular to the URL http://localhost:8080/tonr2/sparklr/photos;jsessionid=03B2E814391E010B3D1210241ECF6C0A?code=vqMbuf&state=aTSlVl in my current example.

    The redirect arrives back on Tonr. Now Tonr will process the URL again, but this time it will try to obtain the access token in order to continue with the processing. As before, Tonr will use the OAuth2RestTemplate in combination with the AuthorizationCodeAccessTokenProvider to try and retrieve the access token from Sparklr. In particular they will make a request to the URL /sparklr/oauth/token with the parameters {grant_type=’authorization_code’, redirect_uri=’http://localhost:8080/tonr2/sparklr/photos’, code=xxxx

    That call to Sparklr will be handled by the class org.springframework.security.oauth2.provider.endpoint.TokenEndpoint. This endpoint will create a new instance of OAuth2AccessToken and generate a response with that Bearer token.

    Again Tonr receives this response and now tries again to make the call to Sparklr this time it will pass the Bearer access token, received in the previous step, as part of the Authorization header in the request.

    That is all Sparklr needs to verify the request. The OAuth2AuthenticationProcessingFilter will extract the token from the request and with the help of the Oauth2AuthenticationManager will validate and authenticate the token.

    When the token is verified, the call will finally arrive at the PhotoController which is in charge of serving the photos. Later in the week I will add a couple of UML diagrams that will help understand the relationship between the major classes involved in the OAuth for Spring Security project.

    To understand the internal details of how the Spring Security framework work on the core you can check out the book

    Sunday, February 10, 2013

    Duck typing in Scala (kind of). Structural Typing.

    Scala offers a functionality known as Structural Types which allows to set a behaviour very similar to what dynamic languages allow to do when they support Duck Typing (http://en.wikipedia.org/wiki/Duck_typing)

    The main difference is that it is a type safe, static typed implementation checked up at compile time. This means that you can create a function (or method) that receives an expected duck. But at compile time it would be checked that anything that is passed can actually quack like a Duck.

    Here is an example. Let’s say we want to create a function that expects anything that can quack like a duck. This is how we would do it in Scala with Structural Typing:

    def quacker(duck: {def quack(value: String): String}) {
      println (duck.quack("Quack"))
    }


    You can see that in the definition of the function we are not expecting a particular class or type. We are specifying an Structural Type which in this case means that we are expecting any type that has a method with the signature quack(string: String): String.

    So all the following examples will work with that function:

    object BigDuck {
      def quack(value: String) = {
        value.toUpperCase
      }
    }

    object SmallDuck {
      def quack(value: String) = {
        value.toLowerCase
      }
    }

    object IamNotReallyADuck {
      def quack(value: String) = {
        "prrrrrp"
      }
    }

    quacker(BigDuck)
    quacker(SmallDuck)
    quacker(IamNotReallyADuck)


    You can see that there is no interface or anything being implemented by any of the three objects we have defined. They simply have to define the method quack in order to work in our function.

    If you run the code above you get the output:

    QUACK
    quack
    prrrrrp


    If on the other hand you try to create an object without a quack method and try to call the function with that object you would get a compile error. For example trying to do this:

    object NoQuaker {

    }

    quacker(NoQuaker)


    You would get the error:

    error: type mismatch; found : this.NoQuaker.type required: AnyRef{def quack(value: String): String} quacker(NoQuaker)

    Also, you don’t even need to create a new type or class. You could use AnyRef to create an object with the quack method. Like this:

    val x = new AnyRef {
      def quack(value: String) = {
        "No type needed "+ value
      }
    }


    and you can use that object to call the function:

    quacker(x)

    You can also specify in the function that expects the structural type, the the parameter object must respond to more than one method. Like this:

    def quacker(duck: {def quack(value: String): String; def walk(): String}) {
      println (duck.quack("Quack"))
    }


    There you are saying that any object you pass to the function needs to respond to both methods quack and walk. This is also checked at compile time.

    Under the covers the use of Structural Types in this way will be handled by reflection. This means that it is a more expensive operation than the standard method call. So use only when it actually makes sense to use it.

    Tuesday, February 5, 2013

    Understanding Currying with Scala

    Learning Scala is not an easy task. There are many things to learn. Some of them are very different and some of them seem complex.

    Currying is a technique not necessarily complex, but is one that you probably are not familiar with if you come from Java background as it is not a straightforward technique to apply in that language. Currying allows to turn a function that expects two arguments into a function that expects only one, and that function returns a function that expects the second argument. Creating basically a chain of functions.

    Let’s see with a simplistic example how it works.

    Let’s say we have this two simple classes:

    case class Message(value: String){

    }

    case class Endpoint(prompt: String){
     def send(m: Message) {
       println(this.prompt + " " + m.value)
     }
    }
     
    Now let’s pretend we want to send a Message to an Endpoint in a general function. We can create a function that looks like this:

    def routeTo(m:Message, e:Endpoint) = {
      e.send(m)
    }
    To call this function we would do something like:

    routeTo(Message("hola"),Endpoint("sending"))
    (You could ask why we just don’t create the endpoint and call send with the message like Endpoint(“sending”).send(Message(“hola”)) and there is no reason in this example. Simply to illustrate currying).

    Now let’s suppose we want to send the same message to different endpoints. For that we could use the currying technique. We will basically turn our function into a function that returns another function:

    def route(m:Message) = {
      (e: Endpoint) => e.send(m)
    }
     
    You can see we have created a function that just receives the Message and returns a function that receives the Endpoint and sends the message to that endpoint.

    Now we could do something like the following:

    val routeCiao = route(Message("ciao"))

    routeCiao(Endpoint("sending again"))
    routeCiao(Endpoint("sending over again"))
    You can see that we are assigning the return of route(Message(“ciao”)), which is a function (Endpoint => Unit) to the val routeCiao. In practice this is basically returning the function (e: Endpoint) => e.send(“ciao”) as the value of the variable m is replaced by “ciao” when calling to the route function.

    Then we are simply calling the returned function passing the value of the endpoint as the only argument. So this function is executed and the message is sent to the endpoint.

    You could of course call the currying function without storing the mid result in a val. Like this:

    route(Message("hi"))(Endpoint("sender"))
    Scala supports a more compact way to defining currying functions. We could replace the route function with the following:

    def route(m:Message)(e:Endpoint) = {
       e.send(m)
    }
    The effect is the same if you call like this: route(Message("hi"))(Endpoint("sender")) However to call and store the mid result in a val you need to do it like this:

    val routeCiao = route(Message("ciao")) _


    Note the underscore at the end of the assignment.